An integrated development environment (IDE) is something like a text editor, but that will watch your programming for mistakes, and that will invoke the mechanisms by which your code is translated into something the computer can run. I will cover a lot of this later, but I sincerely believe that getting yourself set up with some good tools right off the bat will provide both context and motivation for learning. To some extent, it does provide tools that can become crutches. No matter to us. We want to get something interesting to happen quickly. We can go back and determine in as much detail as we want how the guts of the system work, but for the kind of thing a scientist is likely to want to do with Java, this is not immediately necessary, and may never become so. So let's dive in.
Step 1: Download and install the Java Developer Kit (JDK)
If you have a Mac with OS X, skip this step. Your computer came with Java installed. There might be an update to the JDK 5.0 version that you need to download from Apple, but probably not.
For Linux and Windows, download the JDK from Sun for your OS. Note that JDK 5.0 is not the latest and greatest- it is, however, the highest version that is available on the Mac as well as the other platforms. Apple has been tight-lipped about why they are not up-to-date, but some say it is because they are waiting for the Leopard version of OS X to release this. I don't know or care; the Java 5 system is fine for learning.
Keep track of where stuff gets put by the installer. Everything should be pretty well spelled out in the Sun documentation, but one never knows.
I am counting on you to do this. There are just too many permutations of OS and machines and directory structures possible to give an account for everyone. On the other hand, I have done this for my Linux and Windows boxes, and just followed the Sun instructions. Nothing bad happened, so far as I can tell.
Step 2: Download and install the Eclipse IDE for Java
There are lots of IDEs available, many totally free. Eclipse is my personal favorite, but NetBeans is fine, and I quit caring a long time ago, once I realized that Eclipse is friendly enough for my needs, and that it doesn't stymie me. My opinion might change if I were writing thousands of lines of code to run CitiBank or something, but I would probably have already jumped off a bridge if that were the case, so the point is moot. Get Eclipse for now, so that we can all work together. If you want to pick something else later, I'll look the other way.
Go to the Eclipse website and download the Eclipse IDE for Java Developers. Do whatever they tell you to do to get set up.
Step 3: Create a "Hello, World" project
The first thing we want to do is confirm that the system we have set up will work as a coherent whole. So we need to create a test project and make sure we can get something to run.
Start the Eclipse IDE. Go to File, New, Project. You should see something like the following:
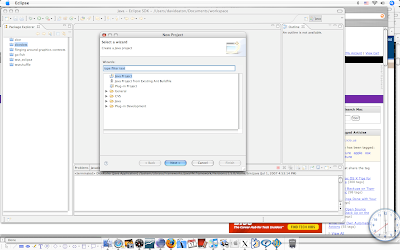
Make sure you are creating a new Java project and click next to see:
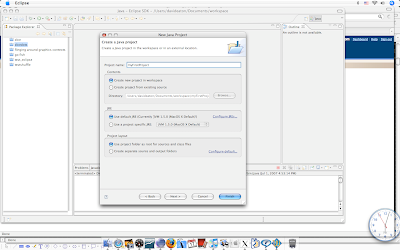
I gave the project the name My First Project. Do whatever you like. Naming can be critical, but it isn't yet. Click finish to create the project. When you do, you will see a little file folder appear, but there will be nothing in it. So go back up to File, New and make a new Class. Classes are the workhorses of Java. We'll get to that.
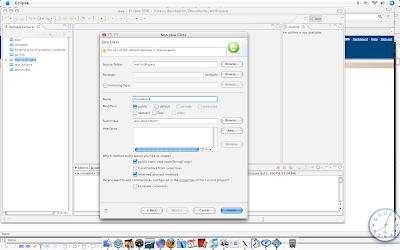
I am calling my class "HelloWorld". Notice that there is a gripe message telling me that use of the default package is discouraged. I don't care at the moment so I'll ignore this. Look down at the options below the class name. Under "Which method stubs would you like to create?" I have checked public static void main(String args[]). This statement looks a bit involved, but suffice to say that this is the entry point for execution in the program we are writing. There is much more to say, but clicking this option saves a good bit of typing in the short run. We'll dissect this later.
Clicking finish pops open the following file:
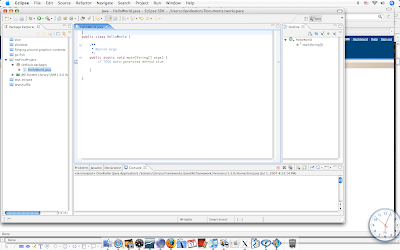
Notice the line that says //TODO Autogenerated method stub. The double slash tells the system that this is a comment. Commenting code is a great thing to begin doing as soon as you start learning to program. Explaining to yourself what you are doing, or confessing to yourself that you do not know exactly how stuff works, is a great self-teaching tool, and it also reminds you many days, months, or years later what you were up to.
Replace the comment with System.out.println(Hello, World); as shown in this pic:
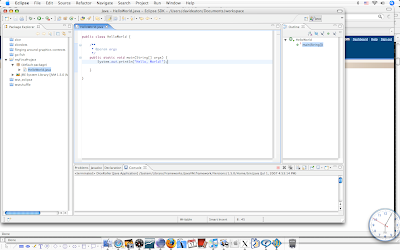
Now save this, by clicking the disk icon or by the File Save route. If you see a red x along side a line of your code, it means there is an error, and the thing won't run without fixing it. Likely errors here are few, but could be failure to capitalize correctly, or leaving off the final semicolon. Make sure these are all fixed, and the file is saved, then go to the menu item Run and choose Run... and a dialog will appear- pick Java application and HelloWorld as the main class:
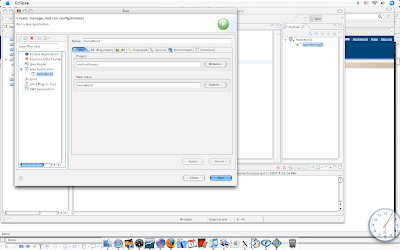
Once this is done, click the Run button. The line "Hello World" should appear in the tab marked "Console" at the bottom of the IDE:
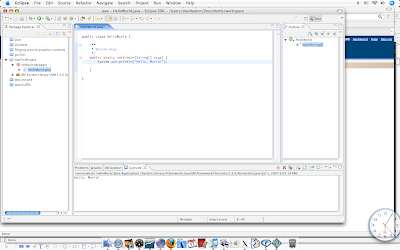
Whew! A lot of work for a little reward, and probably plenty of uncertainty and confusion to go with it. However, if this worked, you are indeed set up and ready to roll, and we will jump into learning Java for real starting next time. Without these things in place, your life would be a lot harder.


1 comment:
Good stuff to begin with... however the result was a bit disappointing. No neon-lighting signs popped up :)
Post a Comment